Tuesday, November 10, 2009

GIVE THANKS


GIVE THANKS


This tutorial was written for those who have a working knowledge of PSP. This tut is meant to be followed as a guide. Please feel free to use any other papers, colors, elements and or tubes! You are only as limited as your imagination!! I wrote this in PSP XI, but it should work with any other version.

SUPPLIES NEEDED:

PSP I used PSP XI, but I’m sure it will work in any other version

Tube of Choice. I am using the beautiful work of Sue Miller. Please do not use this image unless you have bought the tube and have a license to do so. You can purchase the tube, and obtain a license HERE

Giving Grace Scrap Kit…it’s a beautiful FREE Scrap Kit by Sticky Kisses Designs. You can download the kit HERE (scroll down abit to find the kit) Thank you Natasha for this lovely kit!

Font of Choice. I used Autumn Nights which you can find HERE

Before we begin, please don’t forget that if you need to resize anything, don’t forget to adjust sharpen. Drop Shadow used throughout is 2 2 50 and 5

OK Lets Begin!

Open a new image, 700 X 700 We will resize later. Copy and paste Floral 2 Resize by 25 then by 75. Adjust sharpen and add the drop shadow. Duplicate this layer, Image flip then merge down. Move this layer to the left side of your working image. Duplicate this layer and image mirror. And move this to the right. Then duplicate this layer, Image Rotate 90 to the left and place at the top. Duplicate this layer, image flip. Place these layers so it forms a frame. (You can look at mine for placement) Merge these layers visible.

Using your selection tool set on rectangle, draw a rectangle around your frame, making sure you get all the blank spaces. Using a paper of choice ( I used paper 2) resize by 25, Selections invert then delete. Move the paper layer below your frame layer.

Copy and paste the rope layer by 50 3 X and paste on the upper left side of the frame. Add your drop shadow.

Copy and paste leaf 2 resize by 50 2X, and place on the upper left of frame. Add the drop shadow. Resize by 75 image flip and place on the top right. Look at mine for placement.

Using bow of choice (I used bow 3) Resize by 50 3X Place on side of frame. Look at mine for placement. Add drop shadow. Duplicate the bow layer and Image mirror.

Now add your tube, and place to your liking. Add the drop shadow.

Open Ribbon Frame and resize by 50 3 X and place at the lower center of your frame. Add the drop shadow. Open flower 1, resize by 50 4 X and place ontop of the ribbon frame. Add the drop shadow
Merge the layers visible, and resize ALL Layers by 90. Duplicate and on the original layer, go to Adjust Add Blur Radial Blur set on Zoom Blur Default setting.

Open up the orange splatter, resize by 50 2 X and paste the splatter below your blur layer. Effects Edge Effects Enhance more and add the drop shadow.

At this time, add your text and your copyright.

Now merge the layers visible, and resize to your liking. Adjust sharpen. And save as a PNG

Now you have a beautiful Thanksgiving Tag!


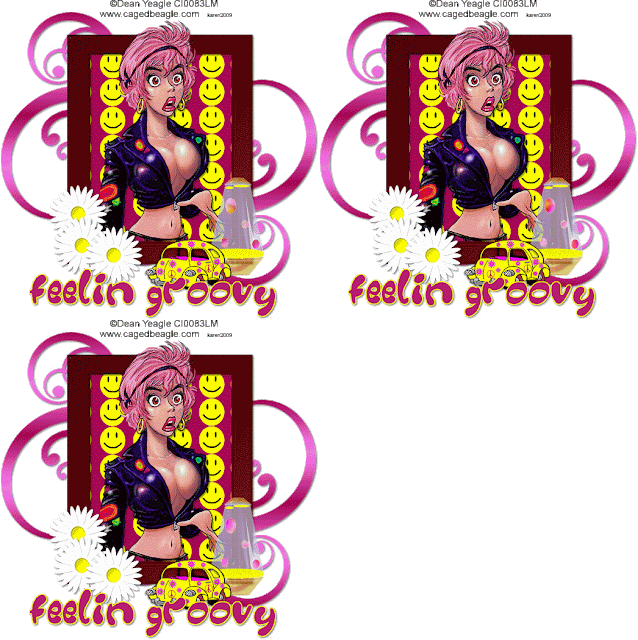
FEELIN' GROOVY


FEELIN’ GROOVY


This tutorial was written for those who have a working knowledge of PSP. This tut is meant to be followed as a guide. Please feel free to use any other papers, colors, elements and or tubes! You are only as limited as your imagination!! I wrote this in PSP XI, but it should work with any other version.

SUPPLIES NEEDED:

PSP I used PSP XI, but I’m sure it will work in any other version

Animation Shop

Eye Candy4 HSB Noise

Tube of Choice. I am using the awesome work of Dean Yeagle. Please do not use this image unless you have purchased the tube, and have a license to do so. You can check out Dean Yeagle’s work, and obtain a license HERE


60’s Fetish Scrap Kit by Whisper Softly Designs. You can purchase it
HERE or HERE Thank you Darla for this “groovy” kit!

Font of Choice. I used GROOVY which you can find HERE


Before we begin, please remember that if at anytime you need to resize, don’t forget to adjust sharpen! Drop shadow used throughout is 2 2 50 and 5

Ok Lets Begin!

Open a blank image 700 X 700. We will resize later. Copy and paste frame 3 to your working canvas. Resize the frame by 25. Using the magic wand, click inside the frame selections expand by 5, copy and paste a paper of choice. I used paper 5. Resize the paper by 15. Selections invert delete. Move the paper layer below the frame. Add the drop shadow to the frame layer.

Copy and paste the tube of your choice and place to your liking. Add the drop shadow to your tube.

Using Doodle of choice, ( I used Doodle 1) Resize by 50 and place on the upper left hand side. Add the drop shadow. Duplicate Image mirror then Image Flip. Merge these two layers and move to below your paper layer.

Resize Beetle bug of choice ( I used Beetle bug 2) by 15, then by 50. I hope you aren’t forgetting to adjust sharpen! LOL! Image mirror, and place on your frame. Look at mine for placement. Add the drop shadow.

Resize Lava of choice by 50 2x. I used Lava 3. Place on the lower right hand side of the frame. You can look at mine for placement. Add the drop shadow.

Resize Flower 5 by 50 3X. Place on the lower left hand side of the frame. Add drop shadow. Duplicate the flower layer 2 times for a total of three, and place to your liking.

Select the Lava Lamp Layer, and using the selection tool set on ellipse, select the dots in your lava lamp. Duplicate the lava lamp layer 2 times for a total of 3. You can rename these Lava Lamp 1, Lava Lamp 2, and Lava Lamp 3. On layer 1 go to Eye Candy4 HSB Noise with the settings on Tie Dye default and apply the filter. Select Lava Lamp 2 and using the same filter, click on the random seed tab. Do the same for Lava Lamp Layer 3.

Add your text of choice using Groovy Font and add your copyrights.

Close off Lava Lamp layers 2 and 3. Layers merge visible. Image resize to your liking, adjust sharpen. Then copy and paste this image into Animation Shop.

Back in PSP, use cntrl Z 3 times, to undo your sharpen, the resize and the merge. Close off Lava Lamp 1, and open Lava Lamp 2. Merge the layers visible. Resize this image and adjust sharpen. Copy and paste this image into Animation Shop after current layer.

Last time in PSP use cntrl Z 3 times again, then close off Lava Lamp 2, open Lava Lamp 3. Merge these layers visible. Resize this image and adjust sharpen. Copy and paste this image into Animation Shop after current layer. Save your tag, and now you have a GROOVY Tag!